|
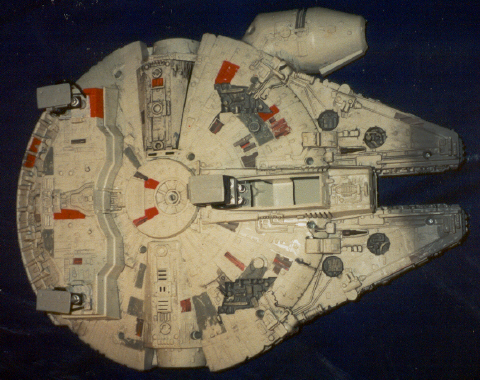
| What started out as a simple repaint, has ended up being a continous work in progress. The first thing I did in this custom was to paint the ship more acurately. I believe I used some reference photos on a poster from an old Star Wars Galaxy Magazine. I painted the panels red and grey as needed on both top (above) and bottom (below) |
|
| After painting the panels, I masked off between the round panels at the back of the ship, and lightly sprayed flat black paint over the back, at an angle. This simulates the burnt spots at the back of the ship. When looking from the top, the black is not as dark, but when looking from the front it is. Spraying at an angle gives it more of a smoked look, like something had ejected from the round panels. You'd just have to see it in person to really understand. I then gave the entire ship a wash in thinned out black, to give it that "used " look. Once the paint dried, I dry brushed some "oxide red" to simulate some rust, and I dry brushed some silver to simulate areas where the paint has chipped off. I then painted the quad-laser cannon with some silver and dark grey. I also sprayed a mist of black paint on the tips of the guns to give them a burnt or scored look. Once the outside of the ship looked truer to the movie, I then decided to work on the inside of the ship. |
|
| I have always felt the inside play area of the Falcon was a little cramped. Since the ship is displayed on a shelf with the landing gear down; and since I do not "zoom" the ship around the room pretending it is flying; the fact that the landing gear actually works didn't really matter much to me. So, I removed the landing gear and dremeled out the tubes in which the landing gear retract. This now left two holes in the back of the ship where the landing gear use to be. I, then, cut out two squares of foamboard and hot glued them into the holes in the back of the ship. Then, I trimed down and glued the back landing gear back in place. Now, I had the landing gear, where the ship could display, and the inside of the ship had a little more room for play value. |
|
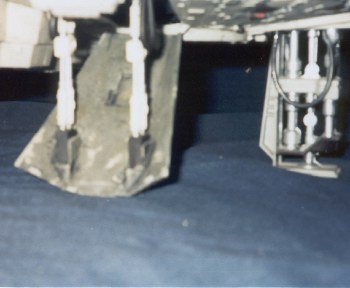
| Next, I painted the landing gear with silver and black paint. I, then, painted the hydrolics on the loading ramp silver and white. Once the paint dried, I hot glued pieces of black single strand wire to the landing gear and loading ramp hydrolics. I left the copper wire inside the black wire housing, this way I could shape the wire in the contour I wanted. Now, the Falcon has hydrolic hoses hanging from the landing gear and loading ramp hydrolics. |
|
| Although, the picture is a bit out of focus, you can make out the hydrolic hoses hanging down. |
|
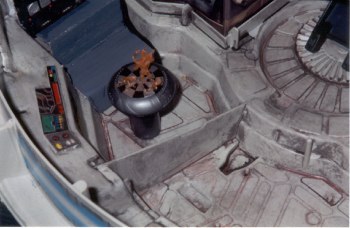
| The next thing to dow was to work on the inside of the "bulk head" area of the ship. I removed the chess table that came with the Falcon. I made a bench out of cardboard, painted it, and glued it where the landing gear retracted by the chess table. In the area where the other landing gear was, by the loading ramp, I glued a computer console, made from foamboard and decals from nuibnuib's universe. I then gave the "bulk head" floor a wash in thinned out black, and another wash in "oxide red" to simulate rusted areas in the ship. I also painted parts of the gunners seat with some silver and black. Finally I glued the chess table from the POTF Chewie. I also glued various hoses and misc. items inside the ship. I left the "hidden floor" in tact. I felt that removing the wall and studs that hold the fake floor would take away from the actual play value of the ship. |
|
| "Bulk Head" area of the ship: holo-chess table, "smuggling compartment", & computer console |
|
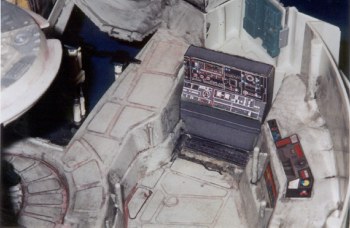
| Finally I worked on the cockpit. I removed the canopy and computer console. I then removed the seats, and moved them back further in the cockpit. This allows two figures to sit better in the cockpit. I then dremeled out the studs that hold the computer console. I painted the console dark grey. I placed the console back in position, layed the canopy on top of the console, and glued the computer console to the canopy. I then glued some of the tubing that comes in the three packs to the top flange of the canopy, and two to the inside of the cockpit. I then added a nail between the tubings to create a hinge, so that the cockpit now opens straight up. With the computer console glued to the canopy, placing and removing figures from the cockpit is made easier. |
|
|
|